Master the Art of DIY Pool Building with These Expert Tips

Rainy Mess? Quick Tips to Revive Your Pool After the Storm!
May 14, 2025
5 Lightning-Fast Ways to Revive a Green Pool!
May 15, 2025
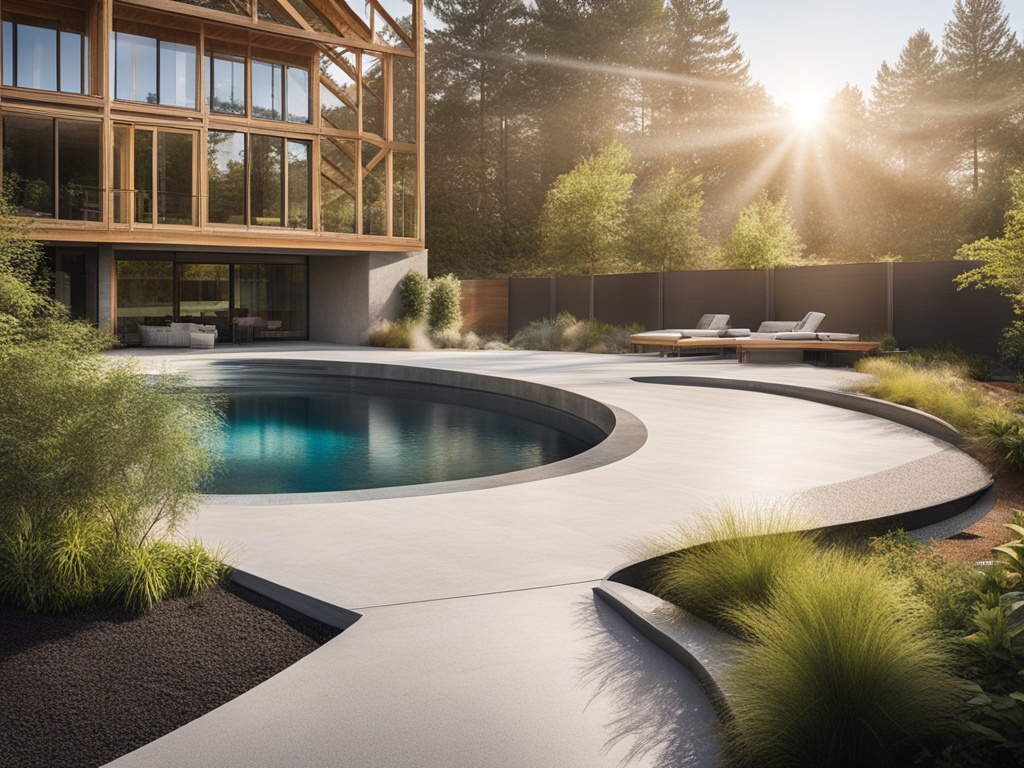
Planning Your DIY Pool Project
Researching Local Regulations and Permits
Before embarking on your DIY pool-building journey, it is imperative to research local regulations and obtain the necessary permits. Many municipalities have specific guidelines concerning pool installations, including safety barriers, fencing requirements, and zoning laws. Engaging with local authorities can provide clarity on these stipulations, ensuring you adhere strictly to legal protocols. Failure to comply could result in fines or even mandate the removal of your pool.
Determining the Ideal Location for Your Pool
Selecting the perfect location for your pool requires careful consideration of various factors. Begin by evaluating the topography of your yard—an area with a natural slope can facilitate drainage but may require additional excavation. Additionally, analyze the amount of sunlight the area receives; ideally, your pool should bask in sunlight for at least six hours a day to maintain comfortable water temperatures. Don’t forget to consider proximity to trees and shrubs, as debris can necessitate more frequent cleaning.
Creating a Detailed Budget and Timeline
A comprehensive budget is essential in ensuring your DIY project does not spiral out of control. Begin by listing potential expenses, which may include materials, tools, permits, and professional consultations. A suggested budget breakdown is as follows:
| Expense Category | Estimated Cost |
|---|---|
| Materials (concrete, liner, etc.) | $3,000 – $10,000 |
| Tools (excavator rental, etc.) | $500 – $2,000 |
| Permits | $200 – $1,000 |
| Professional Services (if needed) | $1,000 – $5,000 |
Once you have a firm grip on your finances, establish a realistic timeline for each phase of the project. From excavation to installation, anticipate potential setbacks, such as inclement weather or sourcing materials, which could delay progress. A well-structured timeline will not only keep you motivated but also ensure all tasks are completed methodically.
Lastly, lay out a contingency plan, allocating approximately 10-15% of your budget to unforeseen expenses. This proactive approach will cushion unexpected financial strains while cultivating a smoother building experience.
Choosing the Right Pool Design
Exploring Different Pool Types
When embarking on your DIY pool project, the first critical decision revolves around selecting the right type of pool. The three primary categories are above ground, inground, and semi-inground pools. Each type presents distinct advantages and drawbacks tailored to various needs and budgets.
Above ground pools offer a budget-friendly and less labor-intensive option, making them ideal for DIY enthusiasts. They are relatively portable, allowing for easy disassembly and relocation if necessary. Conversely, inground pools boast unparalleled aesthetic appeal and lasting durability, making them a long-term investment. They can be custom-shaped and integrated seamlessly into your landscape. Semi-inground pools, a hybrid of the two, provide some benefits of inground pools with simpler installation and lower costs.
Selecting Materials for the Pool Construction
Once you have chosen the type of pool, the next imperative step involves determining the appropriate materials for construction. Safety, longevity, and visual appeal all hinge on this decision. For inground pools, common materials include concrete, fiberglass, and vinyl. Each material has its unique characteristics:
| Material | Durability | Maintenance | Cost |
|---|---|---|---|
| Concrete | High | Moderate | High |
| Fiberglass | Very High | Low | Moderate |
| Vinyl | Moderate | High | Low |
Concrete pools, although more costly and labor-intensive, allow a wide array of shapes and depths, resulting in a high level of customization. Fiberglass pools, on the other hand, are pre-formed, making them less versatile but easier to install and maintain. Vinyl-lined pools have a low initial cost but may require periodic liner replacements, making them a less durable option in the long run.
Considering Additional Features
When designing your ideal pool, incorporating additional features can significantly enhance both functionality and enjoyment. Consider adding slides, diving boards, and various types of lighting to transform your backyard into an entertainment oasis.
Slides not only provide hours of fun for children and adults alike but also add an element of excitement to your swimming experience. Diving boards contribute to athletic activities, although safety must be a top priority to ensure compliance with local regulations regarding depths and installation. Furthermore, thoughtful lighting choices can create an enchanting ambiance during evening swims and increase safety around the pool.
By carefully weighing the various options and features, you can craft a pool design that genuinely reflects your vision and lifestyle. Embrace the creative possibilities and start mapping out a blueprint that encompasses your aspirations and the practical considerations of pool ownership.
Preparing the Site for Construction
When embarking on your DIY pool project, the initial phase of site preparation is crucial for ensuring a smooth construction process and the longevity of your pool. This stage encompasses several essential tasks, including clearing the area of obstacles, excavating to the proper depth, and ensuring proper drainage and leveling.
Clearing the Area of Any Obstacles
Before any excavation can begin, it is imperative to thoroughly clear the intended construction area. This involves removing any debris, vegetation, or structures that may impede the process. Inspect the location for tree roots, large rocks, and other hindrances that could complicate excavation. Employ tools such as a chainsaw for larger plants and a shovel or spade for smaller items to effectively clear the area.
Additionally, consider the proximity of power lines, underground utilities, and nearby structures. It is advisable to consult with your local utility companies to mark the location of underground lines. This precaution prevents unforeseen interruptions and ensures safety during the excavation stage.
Excavating the Site to the Proper Depth
The depth of the excavation directly influences the functionality and aesthetics of your pool. Generally, standard depths range from 3 to 6 feet depending on the pool’s intended use. Mapping out the desired dimensions using string lines and stakes can facilitate your excavation process. Take precise measurements to ensure the pool conforms to your design specifications, whether it’s a rectangular or freeform structure.
Using a backhoe or excavator can expedite this process, particularly for deeper pools. However, if manual labor is your choice, spading may suffice for smaller designs. Whatever method you employ, maintaining accurate depth measurements throughout is paramount to avoid costly adjustments later.
Ensuring Proper Drainage and Leveling
Effective drainage is pivotal to preventing water accumulation around your pool, which can undermine its structural integrity. During excavation, create a gentle slope away from the pool site, directing water flow to designated drainage areas or trenches. Consider incorporating a French drain system to manage excess water efficiently.
Moreover, accurate leveling is vital in preventing future issues such as uneven surfaces or pool wall collapse. Utilizing a leveling tool, such as a laser level or a simple A-frame level, can help you achieve a perfectly flat base. Regularly check the levels during the process; this diligence pays dividends in the long run.
Here’s a brief overview of recommended excavation depths for various pool types:
| Pool Type | Recommended Depth |
|---|---|
| In-Ground Pools | 4 – 6 feet |
| Above-Ground Pools | 3 – 5 feet |
| Shallow Wading Pools | 2 – 3 feet |
By diligently executing these preparatory steps—clearing the area of obstacles, accurately excavating to the desired depth, and ensuring adequate drainage and leveling—you lay a solid foundation for your DIY pool project. This groundwork will provide the stability and functionality essential for a successful build.
DIY Pool Construction Techniques
Pouring Concrete for the Foundation
When embarking on a DIY pool project, one of the most pivotal stages is pouring the concrete foundation. This groundwork not only bears the weight of your pool but also provides essential stability. Begin by excavating the area to your desired dimensions, ensuring the base is level. After marking the perimeter, install forms made of wood or metal to shape the foundation. To enhance durability, consider adding reinforcement steel bars (rebar) within the forms before pouring.
Prior to mixing your concrete, ensure all tools are ready. A concrete mixer will save time and effort, yielding a smoother consistency. Aim for a 30 MPa (megapascal) strength mix, which is generally recommended for pool foundations. As you pour, work in small sections, using a trowel to level and smooth the surface to prevent water accumulation. Finally, allow the concrete to cure for at least seven days before proceeding to the next stage. This will ensure optimal strength and longevity of the foundation.
Installing the Pool Walls and Support Structures
With a solid foundation in place, the next step involves erecting the pool walls and necessary support structures. Depending on your preferred pool style, the walls can be constructed from various materials such as concrete, fiberglass, or polymer panels. For a reinforced concrete wall, continue the use of rebar within the wall structure, spacing it appropriately to maintain strength.
Begin by positioning wall panels, verifying plumb and alignment with a level. Secure these elements with appropriate fasteners based on the material used. After constructing the walls, it’s critical to backfill the area with gravel or sand to provide additional support and ensure that the walls withstand lateral pressures from dirt and water.
If you are opting for additional features such as a raised beam or cantilevered coping, now is the time to incorporate these elements. Consult local building codes to ensure compliance with structural and safety regulations, which vary by region.
Plumbing and Electrical Considerations
No DIY pool construction is complete without addressing the essential plumbing and electrical systems. Proper water circulation is vital for maintaining a clean and enjoyable swimming environment. Start by planning your plumbing layout, ensuring that suction and return lines are strategically located to optimize flow. Utilize durable PVC piping for both the drainage and skimmer systems.
| Pipe Size | Usage |
|---|---|
| 1.5 inches | Skimmers and return lines for above-ground pools |
| 2 inches | Drains and main lines for in-ground pools |
For electrical installations, consider the energy needs of your pool equipment, including pumps, heaters, and lighting. It is paramount that you adhere to the National Electrical Code (NEC) and local regulations, employing a licensed electrician if necessary. Ensure that all wiring is rated for wet conditions and use GFCI (Ground Fault Circuit Interrupter) protection to safeguard users from electrical hazards.
Adding Finishing Touches
Applying Pool Finish Materials
Once the structural elements of your DIY pool are in place, it’s time to enhance its aesthetic appeal by applying finish materials. This stage plays a crucial role as it not only contributes to the visual allure of your pool but also impacts its durability and ease of maintenance. Common options for pool finishes include tiles, vinyl liners, and plaster.
Tiles are a popular choice for their elegant look and longevity. They come in various colors and designs, allowing you to personalize your pool space. If you opt for mosaic tiles, they can create intricate patterns that add a touch of artistry. Ensure to use waterproof adhesive and grout that can withstand the pool’s environment. Alternatively, vinyl liners offer a cost-effective and easier-to-install option. They come pre-packaged and can present an array of vibrant colors and designs tailored to your preference.
If you decide on a plaster finish, consider aggregate plaster that incorporates small stones or glass beads to enhance resilience and beauty. Each type of finish requires specific preparation and application techniques, so consulting with the manufacturer’s guidelines is advised.
Filling the Pool with Water and Balancing Chemicals
After the pool finish is complete, it’s time to initiate the filling process. Begin by using a garden hose to fill your pool gradually. This allows any trapped air in the plumbing to escape, ensuring an even fill. Once the pool is filled, it becomes paramount to balance the chemicals in the water, as this step is crucial for maintaining the water’s safety and clarity.
Start by testing the pH levels; ideally, they should be between 7.2 and 7.8. Following this, check the alkalinity and calcium hardness, adjusting them as necessary. Use a reliable test kit to monitor these levels closely, and incorporate chemicals like chlorine, algaecide, and pH balancers when required. Regularly maintaining the chemical balance will prolong the life of your pool and enhance the swimming experience.
Landscaping Around the Pool Area
Enhancing the pool area through landscaping is the final piece of the puzzle in creating your backyard oasis. Thoughtful consideration of landscape design not only augments aesthetic appeal but also improves the functionality of the space. Begin by selecting appropriate plants that can thrive in your local climate and are resistant to pool chemicals such as chlorine.
Incorporate hardscaping features like patio stones, pergolas, or wooden decks that can provide relaxation spots around the pool. Additionally, adding decorative elements such as fountains or water features can create a tranquil ambiance. Formulating a distinct boundary with shrubs or fencing enhances privacy while providing a layer of safety. A well-planned landscape design maximizes both beauty and practicality, making your pool area a standout destination.
| Finish Type | Durability | Cost | Maintenance |
|---|---|---|---|
| Tiles | High | High | Low |
| Vinyl Liners | Moderate | Low | Moderate |
| Plaster | Moderate | Medium | High |
Maintaining Your DIY Pool
Regular Cleaning and Maintenance Tasks
To ensure the longevity and enjoyment of your DIY pool, routine cleaning and maintenance are essential. Regular cleaning schedules should include skimming the surface for leaves and debris, vacuuming the pool floor, and brushing the walls to prevent algae buildup. An efficient pool skimmer can significantly reduce the effort involved, making daily upkeep a breeze. Additionally, investing in a reliable robotic pool cleaner can streamline the cleaning process, allowing for more leisure time.
Monitoring Water Chemistry and Filtration Systems
Maintaining proper water chemistry is crucial for a safe swimming environment. Regular testing of pH, chlorine, alkalinity, and calcium hardness levels should be conducted weekly. Ideal pH levels should range between 7.2 and 7.8, while chlorine levels should be maintained between 1.0 and 3.0 parts per million (ppm). To assist in these efforts, keep a comprehensive water chemistry log to track fluctuations and identify necessary adjustments.
| Water Parameter | Ideal Range | Action Required |
|---|---|---|
| pH Level | 7.2 – 7.8 | Adjust with pH increaser or decreaser |
| Chlorine Level | 1.0 – 3.0 ppm | Add chlorine tablets or granules |
| Alkalinity Level | 80 – 120 ppm | Add alkalinity increaser |
| Calcium Hardness | 200 – 400 ppm | Add calcium chloride for low levels |
The effectiveness of your pool’s filtration system cannot be overstated. Ensure that your filter is cleaned or replaced according to the manufacturer’s recommendations. For sand filters, backwashing every few weeks can significantly enhance performance. Remember that maintaining crystal-clear water also depends on regular monitoring and cleaning of the skimmer and pump baskets.
Winterizing and Preparing for Seasonal Changes
As seasonal changes approach, preparing your DIY pool for winter is paramount to prevent costly damages. Begin the winterization process by thoroughly cleaning the pool, removing any leftover debris, and balancing the water chemistry to avoid corrosion and scaling. It’s advisable to lower the water level below the skimmer and add winterizing chemicals to alleviate potential algae growth during the colder months.
In addition, it is crucial to protect your pool from freezing temperatures. Consider investing in a high-quality winter cover to keep your pool safe from ice formation and falling debris. If your pool is equipped with a heater, make sure to safeguard it from freezing by draining the lines and covering it adequately. Following these practical steps will facilitate a smoother reopening come springtime, allowing you to dive back into enjoyment.
Troubleshooting Common DIY Pool Building Issues
Addressing Leaks or Cracks in the Pool Structure
Even the most meticulously constructed pools can fall victim to leaks or cracks over time. The first step in addressing such issues is to identify the source. Inspect the pool structure, including walls and the bottom, for visible signs of damage. If a crack is discovered, a quick repair may entail the application of a specialized epoxy for sealing. However, for larger fissures, a more comprehensive approach is needed—this may involve draining the pool and patching the area with a mixture of concrete and appropriate sealant.
Dealing with Equipment Malfunctions
Pool equipment malfunctions can severely impact the enjoyment and safety of your swimming experience. Common issues include filtration system failures and pumping irregularities. First, ensure that all connections are secure and the power supply to the equipment is functional. If the filter is clogged, a simple cleaning may resolve the problem. For persistent issues, consult the equipment manual for troubleshooting steps specific to your model. Knowing when to replace parts or equipment is also crucial; frequent breakdowns may signal it’s time for an upgrade rather than repairs.
Common Problems and Solutions
| Common Problem | Possible Cause | Solution |
|---|---|---|
| Cracked Pool Walls | Ground movement or freeze-thaw cycles | Patch with concrete and sealant |
| Cloudy Water | Poor filtration or chemical imbalance | Clean filter and balance chemicals |
| Pump Not Operating | Electrical issues or blockages | Check power and clear obstructions |
Seeking Professional Help When Needed
While the allure of a DIY pool builds confidence, some issues may exceed personal expertise. It is vital to recognize when to seek professional help. Complicated repairs or persistent equipment problems are best handled by experienced technicians. Professional pool builders possess the skills to diagnose problems accurately and implement effective solutions—potentially saving you significant time, effort, and financial resources in the long run.
Preventative Measures for Future Issues
Future-proofing your DIY pool requires consistent attention and maintenance. Regular inspections for leaks, structural integrity, and equipment functionality can mitigate significant issues before they arise. Additionally, keep a maintenance log to track repairs and performance metrics; this log not only aids in identifying patterns but can also serve as a reference for any professional help you engage in the future.
Building Your Confidence as a DIY Pool Owner
With the right tools and knowledge, navigating problems is far less daunting. By implementing these troubleshooting strategies, you can address common issues with poise and reassurance. Building a DIY pool is not merely an exercise in construction; it is an ongoing learning experience that promotes both skill and satisfaction in maintaining a personal oasis.
Learn more about Construction & Materials

Javier Morales is passionate about pool design, maintenance, and outdoor living. With years of hands-on experience, he offers practical tips, creative ideas, and expert insights to help readers make the most of their pool spaces. At Piscina Planet, Javier shares everything from seasonal care guides to the latest trends in pool innovation.


