Master the Art of Drywall: Expert Installation Tips Revealed!

Unveiling the Ultimate Insulation Materials Showdown
May 29, 2025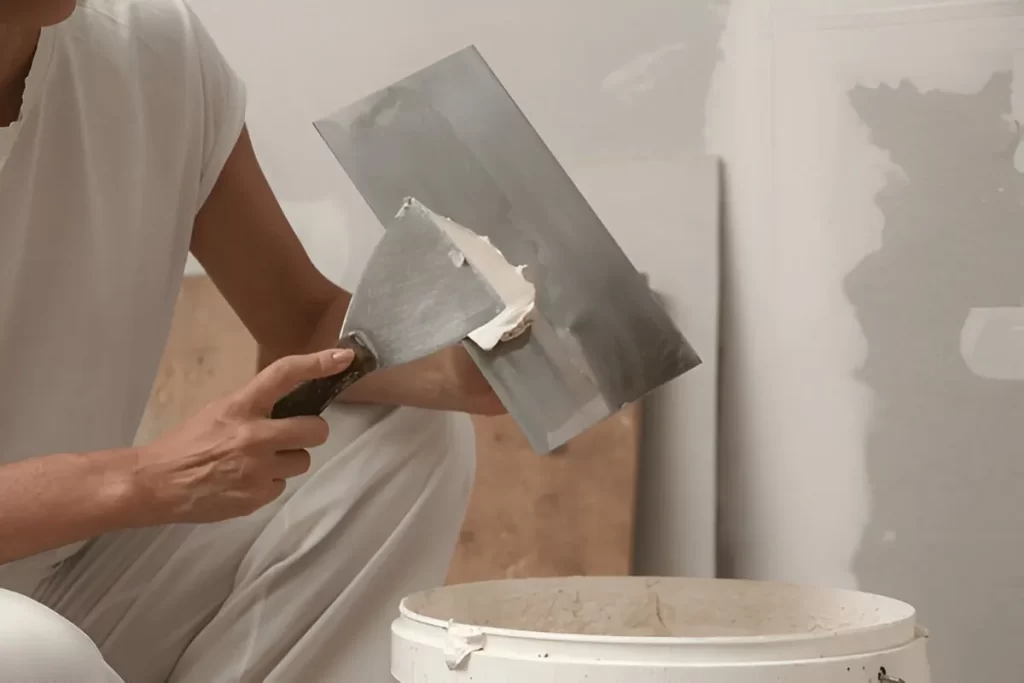
Selecting the Right Drywall Materials
When embarking on a drywall installation project, the first critical step is to select the appropriate materials. Different environments within your home necessitate specific types of drywall to ensure durability, safety, and performance. This section delves into the various drywall options available, with a focus on their applications, particularly within the context of swimming pool areas and associated rooms.
Types of Drywall
There are several varieties of drywall, each designed for specific applications:
| Type of Drywall | Features | Best Suited For |
|---|---|---|
| Regular Drywall | Standard thickness, lightweight, and easy to handle. | General interior applications. |
| Moisture-Resistant Drywall | Coated with a moisture barrier, designed to resist humidity. | Bathrooms, kitchens, and areas near swimming pools. |
| Fire-Resistant Drywall | Contains additives that improve fire resistance. | Near fireplaces, kitchens, and stairwells. |
| Soundproof Drywall | Heavier, with sound-dampening properties. | Shared walls or home theaters. |
Choosing the right type of drywall can significantly impact the longevity and comfort of your indoor environments, particularly for homes with swimming pools where moisture management is paramount.
Choosing Drywall for Specific Areas
In spaces that are regularly exposed to high humidity, such as around swimming pools, using moisture-resistant drywall is advisable. This type of drywall features a protective coating that makes it impervious to mold and mildew, ensuring a longer lifespan for your walls. When installing drywall near water features or in bathrooms, always prioritize moisture-resistant options, which help maintain a healthy indoor atmosphere.
For areas that may require additional safety measures, such as kitchens or near stoves, fire-resistant drywall is a critical choice. Its enhanced properties can slow the spread of fire and protect your home from heat damage. Install this type of drywall in regions where fire hazards are elevated, especially in multipurpose areas that combine cooking and recreation.
When it comes to soundproofing, particularly in homes where leisure and entertainment occur near swimming pools, soundproof drywall is an excellent selection. It excels in reducing noise transmission, creating a serene environment for relaxation. If your pool room is adjacent to living spaces, consider integrating soundproofing measures during drywall installation to enhance comfort and privacy.
Ultimately, selecting the right drywall for your projects involves balancing functionality and safety. Each type of drywall fulfills a distinctive role, and understanding these roles will allow you to make informed decisions that benefit your home while ensuring resilience against the unique challenges posed by humidity and fire risks.
Preparing the Work Area
Before undertaking the task of drywall installation, properly preparing the work area is pivotal for ensuring a smooth and efficient process. A well-organized space not only enhances productivity but also safeguards against potential mishaps, such as damage to surfaces or mislaid tools. By investing time in preparation, you lay the groundwork for a project that proceeds with minimal interruptions.
Clearing Out Furniture
To commence preparation, the first step involves clearing out furniture from the installation zone. This action prevents accidental damage to valuable items, as drywall installation can be a messy endeavor characterized by dust and debris. Remove furniture, fixtures, and any other obstructions from the vicinity. If relocation is impossible, consider covering bulky items with drop cloths or plastic sheeting for added protection.
Covering Floors
The next critical aspect of preparing your space is effectively covering floors. Whether your flooring is hardwood, tile, or carpeted, shielding it from falling debris, dust, and potential liquid spills is vital. Use heavy-duty plastic sheets or canvas drop cloths that can withstand the rigors of your installation project. Lay the covers securely to avoid any slipping, ensuring a safe environment for all involved.
Gathering Necessary Tools and Supplies
Equipping your work area with the proper tools is essential for a successful drywall installation. Prior to commencing work, create a checklist of indispensable items. Below is a table of essential tools and supplies that should make it to your preparation list:
| Tool/Supply | Purpose |
|---|---|
| Drywall Sheets | Primary material for installation. |
| Drywall Screws | For securing drywall to framing. |
| Drill | Fastening screws efficiently. |
| Utility Knife | Cutting drywall sheets to size. |
| Tape Measure | Measuring dimensions accurately. |
| Level | Ensuring proper alignment of drywall. |
| Sanding Sponge | Smoothing joints after sealing. |
With tools gathered and the work area organized, you are now poised to undertake the drywall installation with confidence. A systematic approach to preparation not only fosters efficiency but also significantly elevates the quality of your finished project. By prioritizing these preparatory steps, you set the stage for a seamless installation experience that is devoid of unnecessary complications.
Measuring and Cutting Drywall
Accurate Measurement Techniques
Accurate measurement is the bedrock of successful drywall installation, particularly in spaces like swimming pools where humidity and moisture are variable. To begin, you should gather essential tools: a tape measure, pencil, straightedge, and a T-square. In a typical scenario, measure the height and width of the wall area meticulously, ensuring to account for any windows, doors, or irregular features. When measuring, it’s prudent to measure each section at least twice to avoid costly errors. A good practice is to mark your measurements directly on the drywall sheet to remind you of sizes as you proceed.
How to Use a Utility Knife for Smooth Cuts
Equipped with a high-quality utility knife, the next step is to cut the drywall accurately. Begin by scoring the drywall surface with the utility knife, applying firm pressure along the marked line, but be cautious not to press too deeply. The goal is to create a clean cut without compromising the integrity of the back side. Once you’ve scored the line, gently snap the drywall downwards to break it along the groove. This technique ensures a smooth edge that facilitates easier installation, especially in areas exposed to water.
Leveraging a T-square for Precision
A T-square is an indispensable tool in drywall installation that assures your lines are perfectly straight. To use one effectively, place the T-square along the edge of your drywall sheet, aligning it with your marks. Ensure that the short side of the T-square gently rests against the edge of the drywall, allowing you to draw straight cutting lines. This method not only enhances measurement accuracy but also streamlines your cutting process, reducing waste and unnecessary labor.
Employing a Drywall Saw for Intricate Cuts
For intricate cuts around outlets, switches, or fixtures, a drywall saw is your best friend. A drywall saw is designed with a tapered blade that allows for easy navigation in tight spaces. Begin by marking out the required openings with clear dimensions. Insert the saw gently through the drywall’s surface, allowing the blade to cut through as you move it in a back-and-forth motion. The fine teeth of the saw can manage the delicate approach needed for detailed work, ensuring you maintain the integrity of the surrounding area as you cut.
Tips for Clean and Efficient Cuts
To ensure the highest quality results, take care to keep your tools clean and sharp. Dull blades can lead to ragged edges that may be hard to conceal during finishing. Furthermore, when cutting drywall in humid environments like near swimming pools, always wear a dust mask to protect your lungs from dust particles. Consider completing all your measurements and cuts in advance; this not only saves time but also minimizes the likelihood of re-measuring and unnecessary cuts.
Cutting Drywall Sheet Sizes
| Sheet Size | Common Uses | Install Method |
|---|---|---|
| 4′ x 8′ | Standard walls | Screw or nail |
| 4′ x 12′ | High ceilings | Screw or nail |
| 5′ x 8′ | Commercial projects | Screw or nail |
| 2′ x 2′ | Ceiling tiles | Screw or nail |
Installing Drywall Sheets
When it comes to drywall installation, precision is paramount. Properly hanging drywall sheets not only contributes to a visually appealing finish but also enhances the structural integrity of your space, particularly in moisture-prone areas like swimming pool surroundings. Here’s a comprehensive step-by-step guide to ensure you hang drywall sheets effectively.
Step-by-Step Instructions for Hanging Drywall
- Measure and Cut: Begin by measuring the wall space and cutting your drywall sheets accordingly. Use a utility knife for clean cuts and ensure each sheet fits snugly against the studs. If you’re installing drywall in locations that experience moisture, like pool areas, consider using moisture-resistant board.
- Position the First Sheet: Start by positioning your first drywall sheet against the wall. Align it with the ceiling and one side of the wall to maintain a straight line. Ensure that the paper side of the drywall faces outward; this is crucial for adhesion and aesthetics.
- Secure the Sheet: With a drywall lift or a helper, hold the sheet in place and use drywall screws to secure it. Begin fastening from the center working your way out to the edges. Place screws every 12 to 16 inches along the studs to achieve optimal hold.
- Ensure Even Spacing: As you install additional sheets, ensure that there is a gap of about 1/8 inch between the sheets at the seams. This spacing prevents cracking and allows for slight expansions.
- Check for Level: After securing each sheet, use a level to check for evenness. Adjust screws as necessary to keep surfaces flush, especially on long spans.
- Seal Joints: Once all sheets are installed, it’s essential to tape and mud the joints using joint compound. This step creates a smooth surface for painting and helps mask minor imperfections.
Tips for Securing Drywall to Studs
Securing drywall efficiently is crucial for minimizing gaps and enhancing durability. Here are some efficiency tips:
- Use Quality Screws: Opt for drywall screws instead of nails as they provide superior holding power and reduce the risk of popping.
- Stagger Your Joints: For the best stability, stagger the drywall joints. This technique distributes weight evenly and enhances structural integrity, especially important in areas exposed to humidity.
- Mark Your Studs: Prior to installing drywall, mark the exact locations of studs on the floor and ceiling with a pencil. This allows for precise screw placement, ensuring a solid attachment.
- Check Spacing Regularly: Between drywall sheets, regularly check the gap spacing and adjust screws to ensure a consistent 1/8 inch, minimizing the appearance of seams.
Helpful Drywall Installation Table
| Tool/Material | Purpose |
|---|---|
| Drywall Sheets | Wall covering and insulation |
| Utility Knife | Cutting drywall to size |
| Drywall Screws | Securing drywall to studs |
| Screw Gun | Driving screws efficiently |
| Joint Compound | Taping and finishing seams |
Taping and Mudding
The art of taping and mudding is pivotal in achieving a flawless drywall finish, especially when working in spaces like swimming pool areas where humidity levels can challenge even the best installations. The process involves meticulously applying joint tape and drywall compound to create seamless transitions between sheets of drywall, concealing fasteners, and prepping the surface for paint or other finishes. Understanding this essential phase not only elevates aesthetic appeal but enhances the durability of the installation.
Joint Tape Application
Applying joint tape is a crucial first step in the taping process. There are two primary types of tape used: paper tape and mesh tape. Painters often prefer paper tape for its strength and ability to create smooth finishes, whereas mesh tape is easier to work with in repairs but can be prone to cracks. Begin by applying a thin layer of joint compound (often referred to as “mud”) over the seam using a drywall knife. Lay the tape over the wet compound, pressing it down gently with a knife to eliminate air bubbles. Ensure the tape is centered over the joint for optimal results.
Applying Joint Compound
Once the joint tape is firmly in place, it’s time to apply additional drywall compound to encapsulate the tape completely. Use a larger drywall knife for a smoother application—typically, a 10-inch knife works well for initial coats. Apply the compound in wide strokes, feathering the edges out to blend seamlessly into the surrounding drywall. The goal here is to create a smooth surface that extends well beyond the joint itself, which will minimize the visibility of seams in the final finish. A good rule of thumb is to apply three separate coats of mud, each progressively wider than the last.
Sanding for a Professional Finish
After each coat of compound has dried—usually about 24 hours, depending on humidity and the thickness of application—sanding is essential to achieve a professional look. Use a sanding block or pole sander with fine-grit sandpaper (around 220-grit is ideal) to gently level the surface. Always sand the compound when it is completely dry to avoid creating a mess. After sanding, wipe away any dust with a damp sponge before applying the next coat of compound. This ensures a solid bond and an impressively smooth finish.
Common Mistakes to Avoid
To guarantee an impeccable finish during the taping and mudding process, it’s vital to be aware of common pitfalls. One significant mistake is applying compound too thickly in one coat—patience is key, and thinner layers will yield better results. Additionally, avoid using a rattling sander, as it can create uneven surfaces. Lastly, not properly feathering the edges of the compound can lead to noticeable seams after painting, so always strive for gradual transitions.
Helpful Tips and Tricks
| Tip | Description |
|---|---|
| Use a Wet Sponge for Smoothing | For the final coat of compound, consider using a wet sponge to enhance smoothness after initial drying. |
| Check for Imperfections | Using a bright light or flashlight at an angle can reveal imperfections on the surface before painting. |
| Invest in Quality Tools | A high-quality drywall knife and a sturdy sander will assist greatly in achieving a professional resultaat. |
The taping and mudding process is a pivotal aspect of drywall installation that, when executed correctly, contributes to both aesthetics and structural integrity. Taking the time to master these techniques will ensure your drywall projects in swimming pool areas, or any environment, not only meet but exceed expectations.
Sanding and Priming
Tips on Sanding Drywall Seams and Surfaces for a Smooth Finish
Sanding is an essential step in achieving a flawless drywall installation, particularly when preparing seams and joints. To begin, use a medium-grit sandpaper (around 120-grit) on a sanding block for the best control. Lightly sand the joints and corners where the drywall meets, ensuring even pressure to avoid gouging the surface. This method not only smooths the joint compound but also allows for easy blending with surrounding drywall surfaces. For corners and intricate areas, consider utilizing a corner sanding tool, which can facilitate access to tight spots without marring the finish.
After the initial sanding, switch to a finer grit sandpaper (220-grit) for a more refined texture. This step is crucial, as it removes any imperfections left from the coarser sandpaper, resulting in a surface that is ready for priming. Always sand in a circular motion to prevent flat spots and maintain uniformity across the drywall panel. Additionally, ensure you wear a dust mask and goggles during this process, as sanding produces fine particles that can be harmful when inhaled.
Importance of Proper Priming Before Painting
Proper priming is imperative before painting your drywall. It not only enhances the paint’s adherence but also ensures uniform coverage, thereby preventing potential issues such as peeling or chipping down the road. When drywall is unprimed, it tends to absorb paint unevenly, which can result in a patchy appearance, particularly in larger areas such as a swimming pool area, where aesthetics are crucial. Thus, investing time and resources into this step can save you significant headaches in the future.
Techniques for Achieving Optimal Coverage
To achieve optimal coverage, begin by selecting a high-quality water-based primer, specifically designed for drywall. Apply the primer using a roller for large areas, employing a brush for corners and edges to ensure that every surface is adequately covered. A 2-inch brush excels in reaching any crevices that a roller might neglect. When applying, always follow the manufacturer’s recommendations regarding drying times, as each product varies. A second coat of primer may be advisable for areas that exhibit excessive absorption.
Consider temperature and humidity while priming, as they greatly affect drying times and finish quality. Ideal conditions typically range from 50°F to 90°F with humidity levels below 70%. In environments like a swimming pool area, which may be humid, it’s advisable to dehumidify the space beforehand to promote faster drying and better adhesion of subsequent paint layers. Patience is key; don’t rush the process for an expedient result, as proper drying will yield a more durable finish.
Table: Drywall Sanding and Priming Summary
| Step | Recommended Grit | Tools | Best Practices |
|---|---|---|---|
| Initial Sanding | 120-grit | Sanding block, corner sander | Sand in circular motions; wear protective gear |
| Final Sanding | 220-grit | Sanding sponge or block | Ensure smoothness; avoid flat spots |
| Priming | N/A | Roller, brush | Follow manufacturer’s drying guidelines; consider environmental factors |
In summation, paying careful attention to the processes of sanding and priming will significantly elevate the quality of your drywall finishing. Not only do these techniques contribute to a visually appealing final product, but they also help to encapsulate a hygienic environment, especially pertinent in spaces near swimming pools.
Troubleshooting Common Issues
Addressing Bulging Seams
One of the most prevalent issues during drywall installation is the phenomenon of bulging seams. This problem often arises when the mudding process is inadequately executed or when moisture infiltration occurs. To rectify bulging seams effectively, first, assess the severity of the bulge. For minor bulges, employing a fine-grit sandpaper to gently sand down the protruding area can provide a smoother finish.
If the seam is significantly raised, consider re-cutting the affected sections of drywall. Make precise cuts around the bulge and remove the damaged piece. After replacing it, apply joint compound judiciously, feathering the edges to blend seamlessly. An application of a quality primer before painting can also help conceal any remaining imperfections.
Dealing with Popped Nails
Popped nails are another unwelcome issue, typically stemming from inadequate fastening or the natural settling of the structure. To fix popped nails, gently tap the protruding nail back into place with a hammer. Following this, it is essential to cover the nailhead with a coat of joint compound to prevent future visibility. An ultimate solution for chronic nail popping is to replace the nails with screws, as screws tend to hold more securely in drywall.
If frequent nail popping persists, examine the underlying structure. It may be necessary to ensure that the drywall is sufficiently secured to the framing, or even consider additional bracing to bolster stability.
Fixing Uneven Surfaces
Uneven surfaces can mar the aesthetic appeal of any drywall installation, leading to disappointing results. The cause may stem from improper installation techniques or issues with the wall framing itself. To level uneven areas, start by marking the low spots. Use a straightedge or a level to identify discrepancies across the surface.
For minor unevenness, applying additional joint compound can help smooth out the surface effectively. Remember to feather the compound outward to blend into the surrounding area. For more substantial variations, it may be wise to install a furring strip over the uneven surface before reapplying drywall to create a smoother foundation.
| Common Issues | Recommended Solutions |
|---|---|
| Bulging Seams | Sand, re-cut, and replace drywall; apply joint compound |
| Popped Nails | Tap back and cover with joint compound; replace with screws |
| Uneven Surfaces | Identify low spots; apply joint compound or use furring strips |
Ultimately, maintaining the integrity of your drywall installation hinges on preemptive awareness and proactive problem-solving strategies. By familiarizing yourself with these common issues and their respective solutions, you can ensure a more polished final result.
Stay Updated: Discover more about Construction & Materials swimming pool on Google News

Javier Morales is passionate about pool design, maintenance, and outdoor living. With years of hands-on experience, he offers practical tips, creative ideas, and expert insights to help readers make the most of their pool spaces. At Piscina Planet, Javier shares everything from seasonal care guides to the latest trends in pool innovation.